

Why build an oven outside?
I don’t remember encountering an outdoor bake oven until 2006 when I started
working with Clay & Paper Theatre in
Toronto’s Dufferin Grove Park.
Even then, I never put any real thought into bake ovens until I did an internship
with Bread & Puppet Theater in 2008.

On my first day at the magical Vermont farm, artistic director Peter
Schumann gathered us around his outdoor bake oven. He told us about the important role that
bread and community ovens played in his childhood in Silesia. Peter, now 78, bakes bread in his oven every
day, rising at dawn to mill the grain, and marking every loaf with his family’s
bread mark – a sun.

Eating Peter’s bread for five weeks that summer planted
something in me, and not just in my stomach.
The philosophies around the care that goes into baking bread, the act of
sharing it with others, the warmth of the fire and the nourishment of the loaves… an oven is more than just a
utilitarian appliance. It is a symbol of
life and community, a throwback to ancient times and a pebble on the path to a
sustainable future.
I wanted one.

I ordered the book Build Your Own Earth Oven by Kiko Denzer and read it cover to cover.
Three times. This would be our bible.
We started digging the pit for the foundation in June 2011.
Our soil has a lot of clay in it, so as we dug this foundation we saved the
clay/soil in buckets. We then filled the hole with rocks. Having a stone
foundation prevents groundwater from wicking up into the clay of the oven. Then
we started building the first layer of the foundation by setting out a ring of
large stones and cementing them together with a clay/sand mix.
Then we got busy, as tends to happen here in the summer, and
the oven… well, the oven got put on the backburner.
As Spring 2012 arrived I was determined to get the oven
finished, and I spent weeks gathering rocks from all over our property,
chopping hay, and sitting in a large hole digging out buckets of clay. I adopted a new mantra. In the words of Gandhi: “There is more to life than increasing its speed.” Some things just
take time, and building an oven with your bare hands is one of those
things. We live in an era where instant
gratification is the norm; I found this reminder to let things unfold in their
own time immensely reassuring.
So after weeks of preparation, we were ready to build. I put
out a call for volunteers and had a number of people come out to help us over
the course of three days. Everything is more fun with friends around!

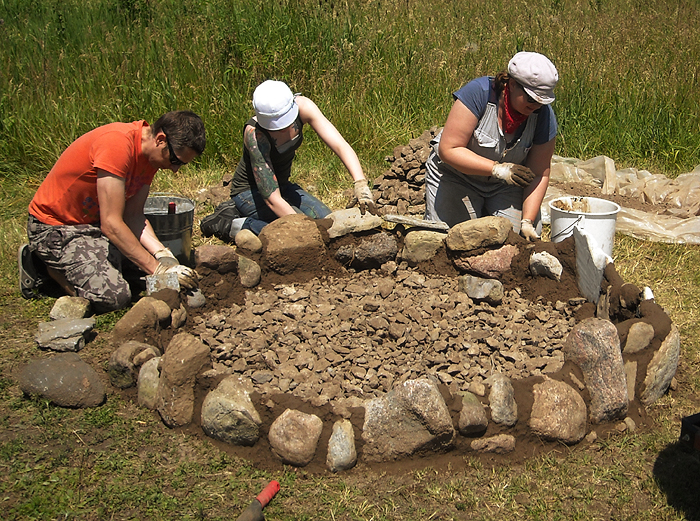
On our first workshop day we built the base. We used larger
rocks for the outer ring and filled it with small rocks and rubble. I got the
idea of a wagon-wheel doorway from a Bread & Puppet book. We just so
happened to have a couple of wagon wheel rims around (weird, I know) so we
embedded one halfway up our base.

When the base was almost waist-high, we laid in a bunch of
wine bottles on their sides as insulation. In a wheelbarrow I mixed
watered-down clay with hamster bedding and chopped straw; this insulation mix was packed around and over the bottles.

On a big tarp we mixed clay and sand and
stomped it with our feet. I cannot even tell you how much fun this was, feeling
the primal satisfaction of mud squishing between toes with mothers and daughters,
children and adults stomping around together. Pure joy!

We put a thin layer of this sand/clay mix over the bottles and insulation mix… and decided to
call it a day.

On our second day we started out by leveling the oven floor
with a thin layer of sand, and carefully laying two layers of firebricks to retain the heat.
We drew a chalk circle of the shape of our oven dome right onto the bricks. We
built a giant sandcastle within this circle – taking up the space that would
eventually be the cavity of the oven. We covered our sand-dome in wet newspaper, and then covered the whole thing in sand/clay mix… And then we called it a day! Thank goodness for my patience mantra, because everything took twice as long as I thought it would.
On our third day we made another muddy mix – this time it
was clay and chopped-up hay. The consistency was very dense and easy to build
with.

After waiting about a week for the oven clay to dry, we shoveled
the sand out. We covered the whole thing with a tent and tarps to protect it from the rain, and we waited
several weeks as the oven cured.
We were planning to build a roof structure over the oven, but
decided that we would save that project for another time. But we did need to weather-proof the oven, so Milé mixed up a lime plaster and applied two coats to
the whole oven and base, about a week apart.
I made a firing door out of an old piece of plywood and wooden knobs; the
inside of the door is lined with a piece of scrap sheet metal. The door has an opening at the bottom to let
air in; as our style of oven has no chimney, this opening will help keep the
fire going.

Thank you so much to our many helpers who pitched in with their
hands, hearts and feet to make this dream a reality!
We’re going to start test-baking tomorrow, and I have a feeling that there's a whole other learning curve ahead of us! The oven will have its public
inauguration at Cornography on July 22, 2012, 2-4 PM. Hope to see you there!
No comments:
Post a Comment